Here’s a PDF cutting diagram. To the remarks on the diagram I’d add pretty much none of the dimensions are really critical.
This is the sort of thing some people might be able to build out of scraps found in the garage, but I didn’t have what I needed so I spent somewhere under $20 on it. I decided on a 2’x4′ piece of ½” MDF. Besides that I used 3 each 3/8″ dowel plugs, ¼x20 threaded rods about 8″ long, ¼x20 nuts, ¼x20 t-nuts, and ¼x20 wing nuts; I also used 6 ¼” flat washers, some wood scraps, some wood glue, and some 3d nails — smaller nails might have been a better choice. As for tools, a table saw would’ve been nice, but I don’t have one. I relied instead on a circular saw, plus a few cuts made on a band saw, a miter saw, and a jigsaw. I also used various twist and Forstner bits in a drill press and a hand drill, and a hammer, sawhorses, and a few clamps. I could’ve done it with fewer of those tools, but it would’ve been harder.
Here’s the build.
First thing was to make an angle reference standard. I used the miter saw to cut a 30° angle from a scrap of wood.
 Then I used that to set the angle of my circular saw blade. I marked a line 6″ from a short edge of my MDF, then clamped a piece of wood parallel to that as a fence.
 I cut that piece off and labeled it “A”. In the picture it’s hard to see the bevel, but it’s on the right side; the bottom surface of the piece is a little narrower than the top.
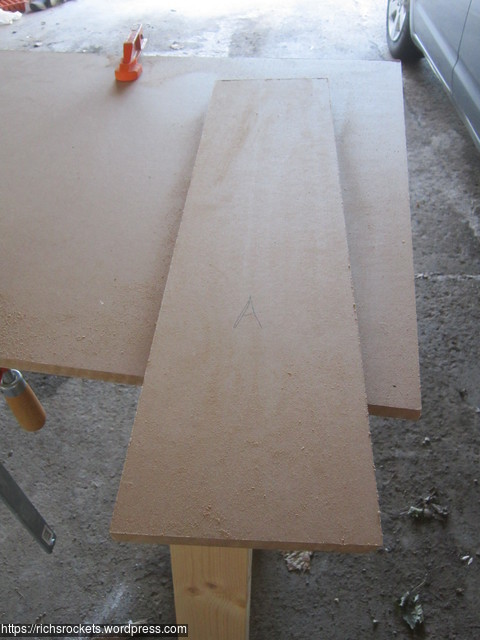 Specifically the width on the bottom face is 5 23/32″ — or more precisely (5 – 0.5/tan 60°)”. In theory. Actually pretty close to fact, too; but whatever the width was, I marked that distance from one of the long edges of the remaining MDF piece, added 1″ (half the width of the upcoming piece B) to that, and then cut off a piece that wide, using the circular saw — set up for perpendicular cutting this time. I didn’t cut all the way to the other end of the MDF, so used a jigsaw to finish the cuts at the corner. This would become pieces F through L later.
  But first I measured 2″ from the beveled first cut, set up my fence again, and cut off piece B. Here you can see the top is narrower than the bottom.
 Next I set up the saw for a 30° bevel again, and cut off piece C, the same width and bevel as A but shorter. Then while still set up for bevels I cut the bottom edge of piece E. Note that the bevel goes the other way on that cut — it needed to be made starting from the opposite edge.
  That was all for the bevels. I returned the blade to perpendicular and cut that last piece in two to make pieces D and E.
 Returning now to that odd width piece I cut off before, I cut pieces F through L.
 For some reason I used the band saw to cut off the shaded triangles from pieces F, G, H, and J. Apparently I forgot about the miter saw…
 Next I flipped C over so the bevel was up (i.e. top surface narrower than bottom) and marked positions for six holes; they’re not critical, but I put them 3″, 9″, and 15″ from the left end and 2″ and 4″ from the rear edge. Then I stacked up pieces A (on the bottom), E, and C (on the top), aligning the left ends and the non-beveled long edges. I put all three piece correct side up (which isn’t necessarily the side that was up when they were cut): bevel down for A and E, bevel up for C. I clamped them together.
 But before drilling any holes I decided to drill a scrap piece of MDF. Good thing I did. The drill press table didn’t provide enough backing and the bottom surface just buckled instead of drilling through. You can see that here along with two more holes I did with a thin sacrificial piece of wood under the MDF.
 Having established my technique I drilled my six holes: 3/8″ on the non beveled side and 5/16″ on the beveled side. (Actually 1/4″, seen here, but I realized later they needed to be bigger and opened them up to 5/16″.)
 I took piece A, still bevel down, and used a 3/4″ Forstner bit to countersink the 5/16″ holes…
 … for the t-nuts.
 I was about ready to start gluing. Another test, though: driving nails into MDF. Into the surface was fine, but into an edge produced an immediate split. The nail on the left went into a pre-drilled hole.
 So I pre-drilled holes and used glue and nails to put pieces C, D, H, and J together, forming a 4-sided box.
 And guess what — the side pieces split anyway.
 Sigh. I forced some glue into the cracks and called it good enough.
Before going further with the gluing I cut the bevel off the end of piece A. This wasn’t really necessary and in fact might have been counterproductive — I probably wouldn’t do this if I were making another one. Then pieces A, B, F, and G went together similarly to the previous step, but before doing that I put pieces K and L onto F and G to serve as feet. These can be used to clamp the fixture to the bench, if necessary. F and G cracked, too, though not as badly as H and J. There must be a better way to do this. Dowels, maybe? Or not; the point of using nails is that they clamp the parts together while the glue dries. Maybe just smaller nails. (Screws won’t hold well in MDF, I understand.)
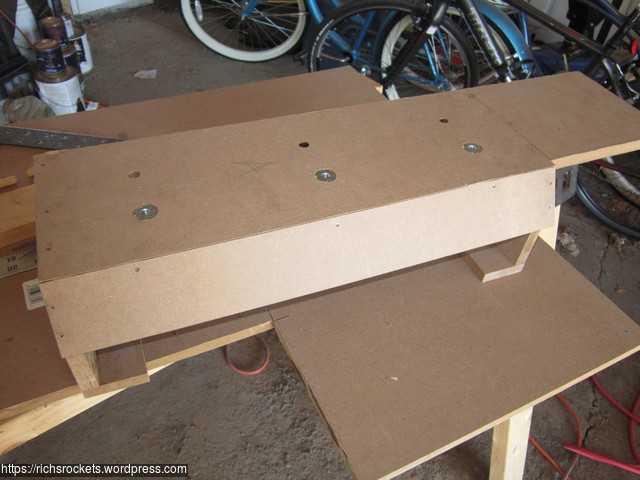 Speaking of dowels, three dowel pins were glued into the rear holes on piece A.
 Final assembly time. The threaded rods went through the t-nuts and were secured on the underside with nuts and washers.
 The other “box” goes on top: the dowels align it, and it’s held down using wing nuts and washers on the threaded rods.
To use it you’d put shims between the two parts, same thickness as the fins. But for the following demo pictures I omitted the shims.
Here’s a BT-80 tube secured with a bungee cord. The surface on the right is where a fin would lie at the correct tilt and cant angles (and position, but that’s up to the builder). BT-80 not big enough? Fine, here’s the 4″ tube from my Excel kit.
 OK, I can go pretty big. What about smaller? BT-60 works.
 Anything much smaller, though, is too small for this fixture. In this configuration. Remember piece E? That’s an alternate top. Swap it in and it looks like it’ll work fine with smaller tubes.
 Though I think for thinner tubes the bungee cords may be a little too enthusiastic. Sewing elastic, maybe, would be better.
That’s it. I haven’t actually used it to glue fins yet, though. Stay tuned for that.


